 Rawlins Paints Blog Industrial Paint Tips, Guidelines & DIY Articles
Our easy 4-step guide below shows how quickly and cost-effectively odours and stains caused by fire can be blocked using Zinsser products, prior to painting with a decorative topcoat.
Because sometimes, accidents happen – ceilings and walls can be scorched in the kitchen due to pans catching fire.
A toaster could be left unattended in a workplace staff room.
Electrical appliances, computers and wiring in offices, schools and libraries can malfunction and spark.
Incorrect use of solvents in industry or simple office stationery can create fire hazards.
Sometimes, fires are started deliberately through vandalism or arson.
The cause of fires can be negated with adequate training – our blog post on Fire Safety In The Workplace being a great place to start. Our extensive range of Fire Retardant Paints and Passive Fire Protection products help prevent the spread of smoke and fire by compartmentalising spaces, particularly with the use of Fire Doors. This can provide extra time for people to evacuate from buildings and for emergency services to arrive, assess the fire, and save property from further devastation.
Fire damage doesn’t have to cost a fortune to redecorate over. Landlords can renovate vandalised properties quickly, with property returning to the market without losing too much rent. Business owners will appreciate the ease and speed with which they can reopen premises and begin trading so soon after a fire.
Quick Links
Click the links below to jump down to each section:
Step 2. Patch Priming & Bring Forward

Step 1. Surface Preparation
Scrape or brush with a stiff-bristled brush to remove loose and failing material to a sound edge, and then remove dust from the fire-damaged surface with a vacuum cleaner.
Those sound edges should then be feathered with fine-grade abrasive paper.
Ensure that the moisture content is not exceeding 18% before painting.
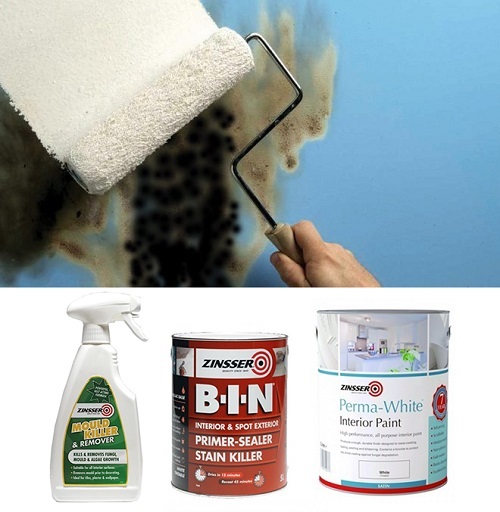
Using Zinsser Mould Killer & Remover, remove visible signs of organic growth in accordance with the manufacturer’s instructions and allow the surface to dry.
Surface defects such as cracks and small holes can be filled with a suitable filler, following the manufacturer’s instructions appropriately, allowing the filled surface to dry sufficiently before rubbing down with fine grade abrasive paper and removing all dust from the surface.
Step 2. Patch Priming & Bring Forward
Using Zinsser B-I-N Primer Sealer, patch prime bare and filled areas and surfaces in accordance with the manufacturer’s instructions and allow 45 minutes minimum, in normal conditions, for the Primer Sealer to dry.
Apply a second coat to bring forward patch primed areas and allow them to dry before moving on to step 3 below.
Step 3. Priming
Zinsser B-I-N Primer Sealer can be then be used to prime all areas prior to decoration, drying for a minimum of 45 minutes.
Step 4. Decoration
Use 2 coats of Zinsser Perma-White Interior Paint in a Matt, Satin or Semi-Gloss finish to decorate the primed, fire-damaged area, allowing 2 hours between coats for it to dry. With 4,000+ colours from RAL, NCS, and British Standard to choose from, businesses, landlords and homeowners can easily match their existing branding and colour schemes.
4 comments
Pingback: How To Paint Over Fire And Smoke Damage (Water-Based Method) | Rawlins Paints Blog
Pingback: How To Paint Over Fire Damage (Odourless Method) | Rawlins Paints Blog
Pingback: How To Paint Over Nicotine Stains (Odourless Method) | Rawlins Paints Blog
Pingback: How To Paint Interior Mildew Areas | Rawlins Paints Blog