 Rawlins Paints Blog Industrial Paint Tips, Guidelines & DIY Articles
Kitchen makeovers are not isolated to domestic kitchen DIY makeovers, and with the Great British Bake-Off being a runaway success around the world, millions of people tune in every week looking for inspiration for their own café or restaurant. In this Rawlins Paints blog-post, we’ll look at everything from painting wooden and stainless steel kitchen cabinets and units to dealing with the sticky issue of condensation around heat sources and window panes.
“Are your kitchen cabinets stuck with a 70s chic? Forget Throwback Thursday and let’s throw away those sickly, sticky shades and splash light and hygiene across them.”
The days of landlords doing a quick fix between tenants and (literally) slapping ghastly wallpaper onto kitchen cabinets has been banished to Room 101 (although paints are available that paint over patterned wallpaper!). Whilst trends, including whitewashing, or sanding down a freshly emulsion painted surface to give it a rustic feel, come and go, the always en-vogue trend of getting kitchen cabinets to look as good as new will never disappear as quickly as BBC’s Changing Rooms.
Quick Links – click on one to go straight to the correct section
-
- Who Would Benefit from Reading This Post
- Industrial and commercial
- Domestic
- Finding Inspiration
- Preparation and Getting Kitchen Cabinet Surfaces Ready to Paint
- FAQ’s: All your kitchen painting questions answered
- How to Paint Your Kitchen Using Rust-Oleum Kitchen Cupboard Paint
- Wooden Kitchen Cabinets
- Hygienic Kitchen Cabinet Paints
- Commercial and Restaurant Kitchen Paints
- Painting Stainless Steel
- Further Resource
Who Would Benefit from Reading This Post?
Each post we publish has a specific audience in mind, and this post is no different – we’ll be covering a little something for everybody, and would appreciate your feedback in the comments section if you have found it useful.
Industrial and commercial
- Factory canteens
- Hospital wards and canteens
- Service stations
- Restaurants and cafes
- Fast food and takeaway property and vending portakabins
- Hostels, hotels, and bed and breakfasts
- Care and nursing homes
- Landlord rented properties
- Schools, colleges and universities – classrooms, kitchens, science labs and canteens
- Leisure centres
- Rehearsal spaces – music and theatre
Domestic
- Homely kitchen units
- Bedrooms
- Spare and storage rooms
- Attic conversions
- Bathrooms
- Sheds and out-buildings
- Caravans, mobile and static homes
- Children’s toy kitchens and storage equipment
- Boiler and immersion heater cupboards
- Internal blinds and basic window shutters
Finding Inspiration When Painting Kitchen Cabinets
“Is your dream kitchen set-up full of pastel shades and gingham curtains, with Mel and Sue stood centrally, proclaiming ‘BAKE!’?”
Pinterest and Instagram, for many, are the go-to sources for either full scale conversions, or simple kitchen cabinet renovations – and there is something for everyone, from box-room kitchens to team motivating office canteens. Personal kitchens can be as elaborate as you like; clashing colours, gravity defying lighting, shelves full of Jamie Oliver, Paul Hollywood, Mary Berry and Nigella Lawson cookbooks, etc. But, commercial canteens will need to follow stricter hygiene policies, with anti-slip floors, always closed fire-doors and new Christmas and birthday mugs filling up cupboards.
Squeezing in style, substance and a tight budget will lead many to local car-boot sales and charity shops for chic owl designed utensil pots, or Breaking Bad inspired mixing bowls. Commercial properties, however, will be on an accountable budget, which leads many of them to Rawlins Paints, where we often get phone calls and emails asking us for advice.

Here’s what we would say:
Preparation and Getting Kitchen Cabinet Surfaces Ready to Paint
We’re not looking for a fight here, and the easier the job the better – so, let’s size up the job:
Empty out all cupboards and drawers, have a general clean-around, check the condition of the hinges and if you’re removing doors and drawers for a more thorough paint and refurb, make sure that they’re labelled so that they will be put back in the right place!
Masking-tape off any parts which are adjoined to walls, surfaces, framework or other parts of kitchen units which you do not want to accidentally get paint, stain or varnish on. This will include glass windows that some cabinet doors have.
For community, staff rooms and shared kitchens, it would be best to put some signs up prior to work commencing, letting people know to use other facilities and or move their own foods and utensils.
Wood, wood-laminate and metal kitchen cabinets can be painted, or repainted easily, with little surface preparation required. Do the wooden cabinet doors have raised panels or routed profiles? Are there any intricate architectural detailing in the woodwork? *More detailed cabinet doors will take longer prep time.
Top Tip: Check that the cabinet handles or knobs can easily be removed – this will save a lot of time ‘cutting in’ around them, and possibly spoiling them. Alternatively take them off and once you’ve finished painting replace them with new, funky door knobs.
Plastic laminated doors are not as easy to paint-over. Refinished surfaces like this may require more specific products, and a strong primer.
Top Tip: Are you looking to match redecorated kitchen cabinet doors with cabinet drawers? Check that they were installed at the same time and are made of the same material, or have the same finish (wood vs plastic laminate coating).
Check for nicks, dents, scratches and any surface damage that will need sanding out, or filling, before painting work commences. Look for any heavier damage, like warped doors (those that don’t close properly when the hinges are correctly aligned), worn out corners, edges or around the handle, and materials coming loose at glued joints. If there are laminate materials that are peeling away, damp may have set-in to the wood and the door may now have a limited ‘shelf life’.
Top Tip: If there are damaged, worn, or warped cabinet doors that are central to the eye, close to main white goods or preparation areas, can they be swapped with doors that are away from the main eye-line? This is not only for cosmetic reasons, but it may save the damaged doors getting damaged further with more constant use.
FAQ’s: All your kitchen painting questions answered
Rust-Oleum’s answers to popular questions
Can I paint my glossy cupboards?
Yes! Rust-Oleum Kitchen Cupboard Paint is suitable for glossy cupboards. Lightly sand the cupboards with a fine grit sandpaper, give them a clean with a degreasing detergent (Rust-Oleum recommends Zinsser Universal Degreaser & Cleaner). and you are then ready to paint.
How long is the drying time?
Rust-Oleum Kitchen Cupboard Paint is touch dry in one hour and hard dry within four.
Can I paint my melamine kitchen?
Yes! Rust-Oleum Kitchen Cupboard Paint is suitable to paint straight on to melamine kitchens.
Can I use this paint on my worktops?
No. You’ll need a specialist product for this, such as Rust-Oleum Worktop Transformation Kit.
How many m2 does a 750ml tin of Rust-Oleum Kitchen Cupboard Paint cover?
Around 11m2 per coat. Two tins should be sufficient for an average sized UK kitchen.
Do I have to remove my doors?
It isn’t strictly necessary, but you will need to ensure you prep properly if leaving your doors and drawers in situ. Thoroughly mask any areas that should not be painted, for example your hinges and remove the contents of any cupboards.
Your cabinets and hardware will start to show signs of wear once the paint on the hinges starts to crack, so save yourself the aggravation.
If removing your door, remember to use numbered labels to help you remember where everything goes. A piece of masking tape stuck to the back of each piece will do just fine. You should write its exact location (think “above sink, left”) so there will be no guessing where it goes later. Then stash screws and hinges in a jar for safekeeping.
Why do I have to clean the surface before painting?
No matter how clean you think your kitchen is, you need to wipe everything down with a grease remover, otherwise, when you add a water-based paint to an oil- covered door, the paint will not stick. Rust-Oleum recommends Zinsser Universal Degreaser & Cleaner and a non-scratch delicate scrub sponge for stuck on spots.
Should I paint the front or the back of my cabinets first?
You should start by painting the back of the doors instead of the front. Why? Because if you mess up or flip the door too soon and the paint smudges, it will at least face the inside of the cabinet. By the time you get to the fronts of the cabinets, you will be a Pro!
What are the best brushes and rollers to use?
High quality brushes and rollers will make this job much easier, so it is worth going out to buy the correct tools before starting the job.

How to Paint Your Kitchen Using Rust-Oleum Kitchen Cupboard Paint
With no primer or additional protective topcoat needed, Rust-Oleum Kitchen Cupboard Paint makes painting a kitchen as easy as pie. Before Rust-Oleum Kitchen Cupboard Paint came along, painting your units was previously a long, laborious job with the sanding, priming and prep work (not to mention the drying time required for two coats of primer and two coats of eggshell).

1. Before you begin painting, clean all surfaces using a degreasing detergent such as Zinsser Universal Degreaser & Cleaner. This step is super important. If you skip this step, your paint may not adhere to the cupboards.
2. Mask any tricky edges or anything you do not wish to paint, such as the hinges. The tape will allow you to create a clean, crisp edge to the painted surface. Cover your worktops, appliances, and the floor with a sheet to catch any drips.
3. Remove your cupboard and drawer handles and set them to one side. If removing your cupboard doors and drawers entirely, use numbered labels to help you remember where everything goes.
4. Stir the Kitchen Cupboard Paint thoroughly before use. Never shake a paint tin to mix it!
5. Starting with the inside of your cupboard doors and drawers, use a brush to paint any hard-to-reach areas, followed by a short nap roller to coat the remainder of the cupboard.
6. Allow your paint to fully cure for four hours before touching your kitchen. Easy as pie!

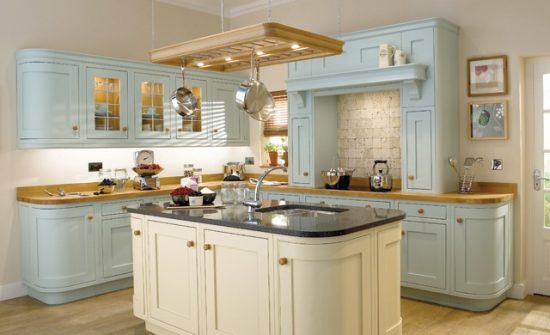
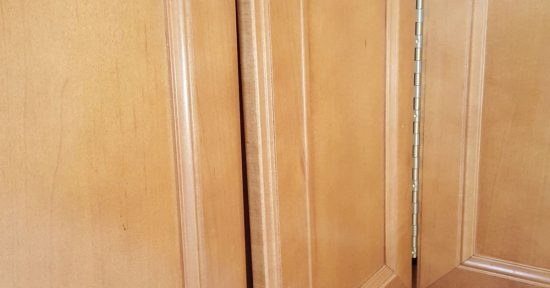
Wooden Kitchen Cabinets
Wooden kitchen cabinets can be the easiest to paint, with a wide range of stains and varnishes also available for a more ornate and antique look. But not all ‘wooden’ kitchen cabinets are handmade from oak, pine or more specialised natural woods, some are made from MDF and compressed or ‘faux wood’.
Below we detail some of our most commonly used systems…
Solid Wood;
- Check for wax: If present remove using wire wool and a proprietary wax removal product. After removal, thoroughly clean surfaces to be painted with Zinsser Universal Degreaser & Cleaner.
- After preparation, prime with 1-2 coats of Zinsser B-I-N or for a low odour option use Zinsser Bulls Eye 1-2-3 Plus.
- Finally, finish with 2 coats of Zinsser Perma-White Interior – a durable, water-based, very low odour, non-yellowing topcoat containing a biocide that protects against mould and mildew – guaranteed for 5 years. Available in over 600 colours and matt, satin or semi-gloss finishes.
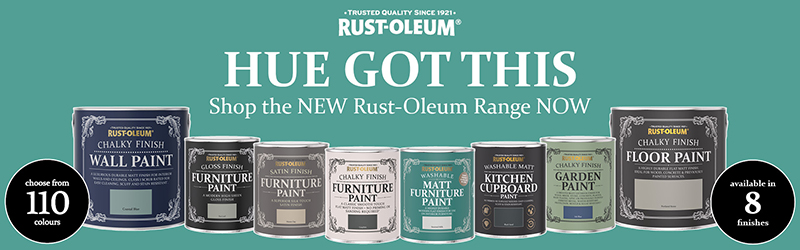
TIP – many of our customers like to use Rust-Oleum Kitchen Cupboard Paint as an alternative topcoat for that ‘shabby chic’ look. Now available in 110 colours and three new finishes – Satin, Gloss and Metallic.
Laminate, MDF;
- Remove any surface contamination i.e. grease, cooking fats, grime, etc. using hot soapy water and a kitchen scourer. After, thoroughly clean surfaces to be painted with Zinsser Universal Degreaser & Cleaner.
- After preparation, prime with 1-2 coats of Zinsser B-I-N or for a low odour option use Zinsser Bulls Eye 1-2-3 Plus.
- Finally, finish with 2 coats of Zinsser Perma-White Interior – a durable, water-based, very low odour, non-yellowing topcoat containing a biocide that protects against mould and mildew – guaranteed for 5 years. Available in over 600 colours and a matt, satin or semi-gloss finish, allowing you to match the newly painted cabinet doors and drawers to electrical goods, wall paint/wallpaper, flooring, lighting, utensils, etc.
Why choose water based, low odour products?
Water-based wood paints won’t emit any strong odours, due to them having a very low solvent content and low VOCs – this means they are ideal for larger commercial kitchens where foods cannot be stored elsewhere during the redecoration process. Water-based wood paints are also quick drying and will allow restaurants and cafes to quickly do the refurb overnight and not have customer service/opening hours’ downtime.
Finally, take a photo and share it with us on this post, or via Twitter and Facebook!

Top Tips: If your wooden cabinet doors have glass in them, pick a neutral colour, like a chalky white finish, for the door and a bold colour for inside the kitchen cabinet – such as a satin forest green.
Hygienic Kitchen Cabinet Paints
Quaint cafes and restaurants all need to adhere to strict hygiene rules, and many of the application instructions from the wooden kitchen cabinet decoration section will be applicable to them. For more closed off kitchens, where neutral colours are used, or everything white, then the following hygienic paints will be suitable, and can be applied as per the last sections.
“For bigger projects than simply kitchen units and cabinets, hospitals, care homes and leisure facilities will find our hygienic paints range includes wall, ceiling and floor paints.”
Rust-Oleum Biosan Aqua Satin can be used on primed wood surfaces and contains the antibacterial agent BACTRON ™ – this has been scientifically proven to kill most types of bacteria and super-bugs. It is ideal for food processing plants, kitchens, dairies, breweries and schools.
In poorly ventilated kitchens (or bathrooms where you may be painting immersion heater or boiler cupboards that have mould damage), damp, mould and condensation issues can be prevalent. For ceilings around units, you might be best to use an anti-mildew paint, with the same being applicable for walls and skirting boards. Each product in our anti-condensation, mould and mildew section focuses on different ‘problems’, so be sure to read the item description and/or datasheet. Remember, we’re on hand to help and recommend a suitable product for you.
So, when painting kitchen cabinets to add some sparkle back into the room, tackle those unresolved mould problems around windows, skirting boards and ceilings too – perhaps you even have mould issues in cupboards near to the cooker, where lots of moisture accumulates whilst saucepans boil.
Commercial and Restaurant Kitchen Paints
In public houses, restaurants and cafes that have previously been owned and handed over, some of the surfaces – shelving, units and kitchen cabinets – may have been left in a poor state. This is where Zinsser’s B-I-N shellac-basic ‘primer, sealer and stain killer’ paint comes in extremely useful. It can even adhere to previously gloss painted surfaces. With minimal preparation (no need to scuff sand surfaces), Zinsser B-I-N works well on water stains, nicotine and burn damage, as well as oil stains.
As an undercoat for unstable wood panelling and trims, Zinsser’s Cover Stain works very well with a wide range of top-coats. It acts as both a primer and a stain-sealer, and it recoatable in 2 hours.
A third option for a stain-blocking paint is Zinsser’s Bulls Eye 1-2-3. A hugely popular product at Rawlins Paints, it works effectively in high-humid areas, including in kitchens that produce a lot of steam.
If a kitchen unit, or kitchen cabinets are being redecorated after fire damage, one of the best primers available online is Mathys’ Pegaprim Isofix. It can seal in the toughest odours from fire and smoke damage. Some restaurants have open fires in the eating area, and this paint/primer can also hide fireplace odours if a room has been redesigned and the kitchen area moved closer to the eating quarters. It is also ideal for kitchen cabinets, making it perfect for your project.
Other multi-surface paints are available at Rawlins Paints, with full technical support provided.
Painting Stainless Steel
A lot of kitchen work surfaces, drawers and units are made of stainless steel. The process of painting stainless steel in commercial and industrial kitchens is a lot different to painting wooden units!
Due to stainless steel being extremely smooth, it can be very difficult for paint to stick to it. Preparation is therefore required to make sure that paint can adhere to and that the steel surface can hold the paint.
Please note the following paint systems are not suitable or intended for countertops or anywhere in direct contact with foods.

In general, paint won’t adhere to or bond with stainless or brushed steel, so here are some steps on how to paint those old and tarnished stainless steel kitchen units:
- Stainless steel areas to be painted will need to be thoroughly cleaned with Rust-Oleum Mathys ND14 Cleaner Degreaser and where possible ‘scuffed’ with a fine abrasive to provide a key without damaging the surfaces – This will give the paint something to bond to. Do not use simply ‘any cleaning product’, as the majority will be completely unsuitable for the depth and breadth of the task. Cleaning is essential but If abrasion is not possible or simply too large a task this step can be omitted but the long-term performance of the subsequent systems will be reduced.
- As described earlier, ensure that you ventilate the room as much as possible, clear workspaces, cupboards and local storage of food, utensils and anything else that can’t be easily cleaned or can be contaminated by the preparation, application or products.
- Wear suitable PPE throughout the whole process.
- Next, it is time to prime the surfaces, allowing the paint to completely bond to the surface. At this point we’re going to split the systems into two, System 1 is single pack and water based (user friendly, cost effective and low odour). System 2 is two pack but still water based, this system will require a little more skill during application but the end finish will result in a far superior and more durable coating system.
- System 1 Primer: Apply 1 coat of Rust-Oleum Mathys Pegalink Universal Adhesion Primer @ 10m² per litre by brush, roller or spray. Allow to dry for 24 hours @ 20°C.
- System 2 Primer: Apply 1 coat of Rust-Oleum 3333 Super Adhesion Primer diluted with 20% clean, cold water @ 25-30m² per litre by brush, roller or air-atomised spray. Do not exceed 25 microns WFT, allow to dry for 16 hours @ 20°C.
- Finally, finish the systems with the following topcoats.
- System 1 Topcoat: Apply 2 coats of Rust-Oleum Biosan Aqua Satin @ 10m² per litre/per coat by brush, roller or spray in desired colour. Allow to dry for 48 hours @ @ 20°C before bringing back into service.
- System 2 Topcoat: Apply 2 coats of Rust-Oleum 9200 Rust-O-Thane @ 9m² per litre/per coat by brush, roller or airless spray. Allow to dry for 48 hours @ @ 20°C before bringing back into service.
Further Resource
Contact Rawlins Paints for any further details about application methods and products discussed within the blog-post.
Any additional feedback is welcomed in the comments section, including questions about application methods, or further product recommendations.
Will a water based paint be durable and tough wearing and stain proof in a kitchen 100%?
Good morning Richard,
Could you let us know some more details please about your requirements? The durability of a water-based paint will depend on the surface it is used on – wood/stainless steel, counter-top/cupboard door – and its environment – domestic/commercial.
A product’s durability and stain resisting measures will depend on its environment and exposure to chemicals/cleaning agents, sunlight, heat, etc. – therefore for Rawlins Paints to be able to recommend the most suitable product for your requirements, it would be best to call us, or send us an email with some more details/photos.
The products and brands recommended in this post are industry standard for commercial and public use, but it will depend on whether you would want to prime surfaces too to get the most out of each’s durability and stain-proofing capabilities.
Please get in contact, Richard, and we’d be delighted to help you further with this.
Best regards.
Mark
This is awesome. The kitchen looks new now! Thanks for sharing this idea.
To my view, before commencing on a expedition to dress up the kitchen, there are several things we need to consider and painting kitchen cabinets is one of such thing that we are bound to consider at any case. I know replacing the kitchen cabinets is the most easiest way to upgrade the look the look of the kitchen. But pricing always matters and if we choose the option of replacement then it will be more expensive than repainting. Apart fro money, another thing we need to consider is the time factor and painting kitchen cabinets is less time consuming than that of whole replacement. Overall, I can say that cabinet painting is the best way to smooth the existing look of the kitchen.